Self-adhesive peel-and-stick wallpapers are intended to be applied to walls as well as other appropriate surfaces. It provides designs that are identical to the conventional ones but have a higher cost-benefit ratio, fusing aesthetic appeal and robustness with ease of installation.
Self-adhesive wallpaper was created to improve the interior design process and deliver a stunning transformation in only a short time. Experts usually recommend peel-and-stick wallpaper for smooth, painted walls with a level surface. Nonetheless, some circumstances where the cover has a mild texture means that you can put the wallpaper on textured walls, and they adapt to a perfect finish.
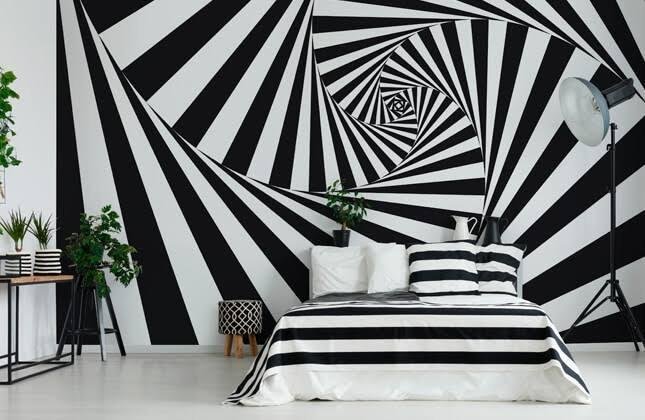
Many people prefer to use black and white peel and stick wallpaper in their houses. It is no surprise because it is a sophisticated choice that complements any interior design style. Black and white contrast adds harmony and classic charm to the space, and it is anything but dull. This sophisticated pair will stand out wherever they go because of their unlimited pattern and design variations. These colors also look great in their spaces, be it a bedroom, the living room, or the bathroom. Join us as this article discusses the house project from white walls to black and white peel-and-stick wallpaper.
Preparation for the Project
Below is a detailed manual to apply the wallpaper. We’ll begin by educating you on the tools you need to install black and white wallpaper. They include:
- Wallpaper
- Primer/pastes
- Sandpaper
- Sticky knife
- Paintbrush for wallpaper
- Tape measure
- A level table or wallpaper tray
How to Install Black and White Wallpaper in a Room, Step by Step
1. Get Your Wall Ready
As your initial step, ensure you prepare your wall for the wallpaper. In terms of protecting yourself, switch off the electrical. Any clips, bolts, or nails should be removed using pliers or a screwdriver. Similarly, wrap the outlets.
To prevent electrocution, it is recommended to activate the wallpaper glue with water. To accomplish a neat paper installation, tape your outlets.
Remove any outdated wallpaper from the walkway. Use your putty knife to scrape off any remaining old wallpaper thoroughly. It will take a while to scrap, so give yourself one or two days for your wallpaper. Make sure to remove the glue and other remnants of the old wallpaper. Use a belt sander if the wallpaper is robust and aged. Scrub the wall thoroughly to get rid of all the grime and mold after removing the old one. In this situation, two cups of bleach and one gallon of water will do the trick.
Paste wall putty on any wall holes or gaps to level out the cracks. For your wallpapering to be neat and shiny, it is vital to patch cracks. You can use sandpaper to flatten the repair into the surface after the wall putty has been applied.
2. Estimate your wall’s dimensions
To ensure the length of the wall covering, measure your wall. When calculating, add 20 cm for the top or bottom room. It can mask inaccurate measurements.
After that, spread out your wallpaper. Carefully unroll it on a table, then indicate or draw lines where you should cut. This is your first strip; lightly cut it out. For this, draw the line on the wallpaper’s back with a light pencil.
Then, draw a vertical line on the space that needs to be papered. Use a pencil and a carpenter’s level. You will be directed down this line when you want to lay your first strip.
3. Paste Your First Strip
The phrase “paste the wall and paper” is a frequent rule. It can be complex and chaotic. Moving the paper from the table to the wall will be challenging once the paste has been applied to it. It will adhere to everything, including itself, which could cause tearing.
So cover the wall with a thick layer of glue or paste. Paste accompanies some wallpapers so that you can hang them without wall adhesive. It is advised that you paste as per the company’s directions.
Gently press the first strip to the wall. Spread it across the wall beginning at the top using a clean cloth or wallpaper brush. There should only be 2 inches of hanging sheet left near the ceiling and the floor. It will look like a marker if you firmly press it on the wall to make a thin line. The marking makes it simple to take away extra wallpaper.
Starting in the center of the paper’s edge, smooth it down. Because this is your debut attempt, the first strip might not be as good as you had hoped. So, be prepared to pull it off and try again, if necessary, carefully. Just be careful to use light strokes to prevent creasing the paper. Remove the form from the wall; smooth it out if you notice any wrinkles when it reaches the wrinkled region.
4. Lay the second strip
It’s more challenging to align patterns and avoid overlay in this second strip than in the first. a pattern progression is not present in every wallpaper. You can lay some as you like for free. If your wallpaper has a pattern, get prepared to pair up and anticipate waste.
After unrolling it, place your wallpaper next to the wall’s first strip. In the case of patterned wallpaper, you should commence the alignment of the patterns in the center. Remember to move it as near as you can.
Ensure the designs align and avoid having the paper overlap. The edge of the second strip must touch the first. Allow a few inches at the top and bottom once again. The seams can be sealed using a seam roller. Before cleaning off the roller, give it five minutes to sit. Don’t press too firmly on the wallpaper to prevent pushing the adhesive out from underneath.
5. Wallpaper problematic corners and areas
To get the corners, lay your paper against the following wall: The edges ought to line up with the designs in the exact manner as before.Then use your cloth or brush to massage it in gently.
Take scissors to make a slight cut at the peak of the corner in which it joins the top when the initial wall is properly positioned next to the corner. The paper will be easy to fold thanks to the incision.
Repeat the procedure at the bottom, in which the corner joins the baseboard or base, prior to actually continuing on to the second wall. Smooth the paper with a cloth or wallpaper brush. To prevent your wallpaper from moving away from the opposite edge, be careful to do this. If it does, carefully pull this out and try again.
Sockets and breakers, which, albeit challenging, are generally fine. The wallpaper above them, you should make sure not to press the strip too firmly against them. Your scissors should be used to cut through the middle. After that, push the paper securely into position and flatten it across the socket’s corners.
Only after paper has dried and had adequate time to rest. It will be easier to see the form of the exit. After that, use a knife to trim the extra paper.
6. Get The Excess Paper Out
You can get the extra paper out in several ways. You can choose to use scissors, a ruler, or your free hand.
Trimming the extra paper with your cutting knife rather than a ruler is sufficient. It is also ideal for inserting a ruler into the gap and cutting with the blade. If this is too tricky, you can pull the wallpaper out and use scissors to rip along the indented line.
Whichever route you take, be cautious and cut slowly.
Also Read:
Choosing the Right Wallpaper
A fun design feature that quietly changes the ambience of any space is wallpaper with designs and vibrancy. Furthermore, wallpapers infuse an unique style to houses while concealing wall imperfections and guaranteeing a rapid, easy, and dust-free placement. Take these factors into account while selecting wallpaper for the interior walls of your home:
1. Texture
Patterns with actual or apparent texture can cover up or disguise architectural menaces or wall flaws. Burlap, foil, stretched vinyl, grass and string cloth, and even fabric are examples of patterns having actual tactile surfaces. Other papers mimic the appearance of materials, including marble, wood, leather, fabric, and even animal skins. Additionally, a layered pattern gives the impression of texture, such as a monochromatic damask design behind a floral design.
2. Choosing a Design That Fits
Choose large-scale patterns in vibrant hues for a formal appearance. Choose small, open, regularly spaced designs like polka dots for a playful, cheerful look. Remember the decorative effect of borders? Borders immediately establish the subject of space because they are available in various motifs and styles, including sports pictures, pastoral scenes, and animal imagery.
3. Lighting
If the area is dark or has no windows, look for wallcoverings with patterns in vibrant colors and those that feature metallic or iridescent inks to reflect light around the space. It would help if you also considered smooth surface patterns because they maximize light reflection. Dark colors block light, giving the impression that walls are closer together and space is smaller. The texture of a surface can also affect how a wall looks.